Brenda’s Best Beauty 2017
I put an embarrassing quantity of my resources into researching and experimenting with beauty products, and it’s time for everyone to benefit! I get zero kickbacks from these recommendations or links. Just having fun!
EYES
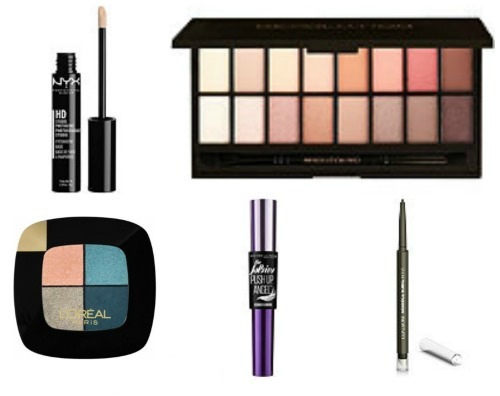
NYX HD Professional Eyeshadow Base // Makeup Revolution New-trals vs. Neutrals Eyeshadow Palette // L’Oreal Colour Riche Shadow Quads in Haute Hazel // Maybelline The Falsies Push-Up Angel Waterproof Mascara // Cover Girl Perfect Point Plus Eyeliner
2017 was my year for learning about primer, and I lucked out on the first try with this NYX eye primer. Even after a long run at the end of the day, my eyeshadow still looks fresh. It’s pretty amazing.
Technically I started using the New-trals vs. Neutrals palette in 2016, but it remained my favorite this year, and that’s saying a lot given my MR palette haul in September! The reds and purples are on trend without being too much. I’ve also gotten compliments every time I’ve used this L’Oreal quad. Blue eyeshadow will always seem really 80s to me, so I feel fun and rebellious wearing it.
Best In Show: I tried MANY mascaras this year, including the revered Benefit They’re Real!, but none came close to this Maybelline mascara with the Victoria’s Secret name. It lifts, curls, and enhances. I think I’m ready to put a ring on it.
I’m very picky about eyeliner, and remain pleasantly surprised by Cover Girl’s Perfect Point Plus, which I have in green and burgundy. The only other brands that pass my muster are L’Oreal Colour Riche and Rimmel Exaggerate Smoke n’ Shine. All other chalky, clumpy, and goopy eyeliners are dead to me.
FACE

L’Oreal Infallible Pro-Matte 24 Hour Foundation // Real Techniques Concealer Brush // Oz Naturals Ultra Ageless Eye Creme // NYX Tinted Brow Mascara
As I frequently gripe, the struggle of being a grown woman with a 16-year-old complexion is REAL. In my experience, most skincare and beauty companies have no idea what true oily skin is. But Infallible Pro-Matte is a very decent effort, even better than Maybelline Fit Me Matte, which I was using before. With the Pro-Matte foundation and powder, I can stay shine-free for about four hours. Woo!!
I use mostly Real Techniques makeup brushes and am glad I picked up the concealer brush this year. I think you have to buy it individually, as I haven’t seen it packaged with any of the face brush sets.
Despite my oily skin, my undereye area is starting to need more serious attention. After trying a few meh options, I found this Oz Naturals cream in an Amazon search and have been really happy with it! I use this at night, and Garnier Moisture Rescue gel cream during the day.
This NYX brow mascara is the easiest brow product out there if you’ve used all your primping time on other stuff (i.e. me every day). I use Brunette (Chocolate was too light).
NAILS

Revlon Colorstay Gel Envy Longwear Nail Enamel in Hold ‘Em and Double Down // OPI Do You Sea What I Sea?
First of all, I couldn’t save a product photo, but CVS Beauty 360 Pro Strength Nail Polish Remover has CHANGED MY LIFE. I keep my nails painted 90% of the time, not for vanity, but because they split and break otherwise. I’m good at doing them myself, but when I feel an urge to go to the salon, it’s often largely so someone will remove old polish for me. I used to spend 10 minutes scrubbing it off. Then I discovered this stuff. Even glitter polish is no match for it. Best $5 ever spent.
This year I mostly wore Revlon Colorstay Gel Envy, which is cheap (especially at Target or Kroger), lasts a week or more, and comes in great colors. Here are two of my favorites. I also fell in love with this blue OPI shade on one of my occasional trips to Spa Nail.
ACCESSORIES

Babyliss Nano Titanium Portofino Dryer // Brush Cleaning Mat // Palette Organizer
After replacing the same Conair hair dryer for most of my 30s, I decided to upgrade to this Babyliss Portofino dryer. It has a five-year warranty, and I have been VERY happy with it! Don’t bother with the matching Babyliss finger diffuser – get the generic $5 diffuser from Sally Beauty or Amazon instead. I felt the Babyliss one made my hair too flat. (Oh, and speaking of Sally, I love their coconut-infused comb so much I bought a second one for travel.)
Cleaning my makeup brushes used to feel like an ordeal, so I rarely did it, which we all know is no good. This makeup brush cleaning mat is efficient and makes the process a strangely satisfying BREEZE. The vendor on Amazon keeps changing, but the mat is the same and should never run you more than $6. Again, well worth it.
My aforementioned palette spree made my eyeshadow drawer hard to navigate, so I splurged on this pretty organizer. I love having all the palettes where I can see them, and everything is getting used more often!
HELP ME GET EVEN MORE BEAUTIFUL IN 2018
I’m looking for tips and recommendations for the following:
♥ Eyeshadow crease brush. The Sonia Kashuk one I have isn’t really working.
♥ How on earth to use highlighter. I have a lovely Makeup Revolution highlighter palette that I occasionally take out, admire, and then put away with a shrug.
♥ Better eyeliner application. I’m pretty terrible at it.
♥ Oily skin products and/or curly hair products you’re using and loving!
♥ I enjoy makeup videos and tutorials, so share your favorites! (Bonus if they focus on affordable brands – point of reference, the only beauty vlogger I watch semi-regularly is ShanShortcake.)
About Brenda
Mom to a preschooler with T1D. Paralegal. Swiftie. Xennial. Grizzlies and Tigers. Pilates and Peloton. Books and fanfic. 901 / 305 View all posts by Brenda →Posted in beauty, year end
2 Responses to Brenda’s Best Beauty 2017